Pneumatic Switches: Difference between revisions
mNo edit summary |
No edit summary |
||
| (One intermediate revision by the same user not shown) | |||
| Line 4: | Line 4: | ||
{{rtoc}} | {{rtoc}} | ||
[[Category:Works In Progress]] <span style="color:red;"><br>Under construction/modification by [[User:DErik|DErik]] ([[User talk:DErik|talk]]) 14:40, 20 August 2024 (PDT). Source is Tom Gaps.<br></span> | [[Category:Works In Progress]] <span style="color:red;"><br>Under construction/modification by [[User:DErik|DErik]] ([[User talk:DErik|talk]]) 14:40, 20 August 2024 (PDT). Source is Tom Gaps.<br></span> | ||
=Standard Mounting= | =Standard Mounting= | ||
Sunset Valley switches come with two extra long ties located at the points of the switch. These are called the Head Ties. The extra length normally extends out away from the switch on the side of the departing track (inside curve) (see Fig #1). In some cases the head ties need to be on the other side of the switch and can be ordered with Reverse Head Ties.[[File:TO-01. | Sunset Valley switches come with two extra long ties located at the points of the switch. These are called the Head Ties. The extra length normally extends out away from the switch on the side of the departing track (inside curve) (see Fig #1). In some cases the head ties need to be on the other side of the switch and can be ordered with Reverse Head Ties.[[File:TO-01.JPG|thumb|Fig #1: Head Ties]]<br> | ||
The throw mechanism for the switch is mounted on these Head Ties. Fig #2 shows a manual Ground Throw mounted on the Head Ties and connected to the throw bar with a stainless steel rod. Fig # | The throw mechanism for the switch is mounted on these Head Ties. Fig #2 shows a manual Ground Throw mounted on the Head Ties and connected to the throw bar with a stainless steel rod. Fig #3 shows that rod in better detail. An optional Switch Stand (Fig #4) can be used in place of the Ground Throw.[[File:TO-02.JPG|thumb|Fig #2: Head Ties with manual Ground Throw]][[File:TO-08.JPG|thumb|Fig #3: Throw rod for manual switching]][[File:TO-07.JPG|thumb|Fig #4: Switch stand]] <br> | ||
For automated throws, a remote controlled pneumatic linear motor can be mounted on the Head Ties. The pneumatic motor is a two position cylinder that is operated by compressed air. The cylinder is moved to the Active Position and held there by compressed air; it is returned to the Default (retracted) position by an internal spring when the compressed air is vented away. At full extension the piston will move 9.5 mm. The throw distance for the switch points is 7.5mm, so the pneumatic piston has excess throw distance which allows it to maintain pressure on the points in both Active and Default positions.<br> | For automated throws, a remote controlled pneumatic linear motor can be mounted on the Head Ties. The pneumatic motor is a two position cylinder that is operated by compressed air. The cylinder is moved to the Active Position and held there by compressed air; it is returned to the Default (retracted) position by an internal spring when the compressed air is vented away. At full extension the piston will move 9.5 mm. The throw distance for the switch points is 7.5mm, so the pneumatic piston has excess throw distance which allows it to maintain pressure on the points in both Active and Default positions.<br> | ||
Fig # | |||
Fig #5 and Fig #6 show the pneumatic motor attached to a mounting plate with a single machine screw at one end. This allows the other end to swing from side to side to adjust for a variation in throw rod connection point. The mounting plate is attached to the top of the Head Ties (see Fig #7 and Fig #8). The air line is connected to one end of the pneumatic motor while the piston extends out the other end. The motor comes with a small machine screw on the end of the piston. This screw drops into a predrilled hole in the throw rod. The mounting plate has two holes that can be used to attach the mounting plate to the Head Ties. Before attaching the mounting plate to the Head Ties, be sure the mounting plate is pulled back about 1mm so that the default position spring will be slightly activated, to ensure the switch points are held firmly in place when the spring returns the points to their default position. This will leave about 8.5 mm of piston movement which is more than enough to move the switch points to the Active Position. | |||
{| | {| | ||
|+'''Pneumatic switch with mounting plate''' | |+'''Pneumatic switch with mounting plate''' | ||
|- | |- | ||
| [[File:TO-03. | | [[File:TO-03.JPEG|thumb|Fig #5]] | ||
| [[File:TO-04. | | [[File:TO-04.JPEG|thumb|Fig #6]] | ||
|- | |- | ||
| [[File:TO-05. | | [[File:TO-05.JPG|thumb|Fig #7]] | ||
| [[File:TO-06. | | [[File:TO-06.JPG|thumb|Fig #8]] | ||
|} | |} | ||
It takes 15-20 psi of air pressure to neutralize the effects of the default position return spring and another 15-20 psi to move the points firmly to the active position, i.e. the air line needs to supply 35-40 psi to operate the switch motor. Use only enough air pressure to safely operate the switch points. Excess air pressure will cause the points to slam into position harder than they need to and may cause the points to fail prematurely from repeated slamming in the stock rail. | It takes 15-20 psi of air pressure to neutralize the effects of the default position return spring and another 15-20 psi to move the points firmly to the active position, i.e. the air line needs to supply 35-40 psi to operate the switch motor. Use only enough air pressure to safely operate the switch points. Excess air pressure will cause the points to slam into position harder than they need to and may cause the points to fail prematurely from repeated slamming in the stock rail. | ||
=Alternate Mounting= | =Alternate Mounting= | ||
When the switch is located some distance away, it can be hard to tell if the points have activated. One solution for this problem is to mount a manual switch stand to the Head Ties and connect it to the throw rod. As the points are moved by the pneumatic motor, the throw rod will activate the switch stand, causing it to rotate in response to the change in point settings. Note: You will need to remove the manual switch stand handle as this handle also acts as a locking mechanism preventing the switch stand from following the change in switch point position.<br> | When the switch is located some distance away, it can be hard to tell if the points have activated. One solution for this problem is to mount a manual switch stand to the Head Ties and connect it to the throw rod. As the points are moved by the pneumatic motor, the throw rod will activate the switch stand, causing it to rotate in response to the change in point settings. Note: You will need to remove the manual switch stand handle as this handle also acts as a locking mechanism preventing the switch stand from following the change in switch point position.<br> | ||
Unfortunately, the pneumatic motor and the manual switch stand can not both be mounted on top of the Head Ties at the same time. The solution to this problem is to mount the pneumatic motor on the bottom of the Head Ties. You can either mount it at the same location on the Head Ties but on the bottom of the Head Ties or you can mount it directly under the switch points. Mounting it directly under the points has the added advantage of being able to choose which end of the throw rod to connect to the motor. When mounted at the top or bottom at the standard location on the Head Ties, the Default Position will always be the straight track, or it will be the curved track path if using Reverse Head Ties. Mounting the switch motor directly under the switch points allows either the straight track position or the curved track position to be the Default Position.<br> | Unfortunately, the pneumatic motor and the manual switch stand can not both be mounted on top of the Head Ties at the same time. The solution to this problem is to mount the pneumatic motor on the bottom of the Head Ties. You can either mount it at the same location on the Head Ties but on the bottom of the Head Ties or you can mount it directly under the switch points. Mounting it directly under the points has the added advantage of being able to choose which end of the throw rod to connect to the motor. When mounted at the top or bottom at the standard location on the Head Ties, the Default Position will always be the straight track, or it will be the curved track path if using Reverse Head Ties. Mounting the switch motor directly under the switch points allows either the straight track position or the curved track position to be the Default Position.<br> | ||
Fig #9 shows the pneumatic motor attached to the bottom of the switch, under the switch points. When mounted to the bottom of the Head Ties, some form of protection must be provided to prevent the ballast under the ties from interfering with the movement of the switch motor piston. One solution is shown in Figs 10 | |||
Fig #9 shows the pneumatic motor attached to the bottom of the switch, under the switch points. When mounted to the bottom of the Head Ties, some form of protection must be provided to prevent the ballast under the ties from interfering with the movement of the switch motor piston. One solution is shown in Figs #10 through #13. A length of 2” black PVC pipe cut into a half pipe fits nicely under the switch, straddling the Head Ties and switch motor giving it a protected pocket in which to operate.[[File:TO-09.JPG|thumb|Fig #9: Pnematic switch mounted under switch points, connected to Head Ties]] | |||
{| | {| | ||
|+'''Pneumatic switch mounted under turnout switch points''' | |+'''Pneumatic switch mounted under turnout switch points''' | ||
|- | |- | ||
| [[File:TO-10. | | [[File:TO-10.JPG|thumb|Fig #10: Split a 2" PVC tube in half]] | ||
| [[File:TO-11. | | [[File:TO-11.JPG|thumb|Fig #11: The half tube next to the switch - for size contrast]] | ||
|- | |- | ||
| [[File:TO-12. | | [[File:TO-12.JPG|thumb|Fig #12: The switch surrounded by the tube - view of underside of track)]] | ||
| [[File:TO-13. | | [[File:TO-13.JPG|thumb|Fig #13: The competed switch assembled and as viewed from above]] | ||
|} | |} | ||
Side Notes | |||
=Side Notes= | |||
==Connecting To The Switch== | |||
As supplied by Sunset Valley, the 1/2” 1-72 screw at the end of the piston is not long enough to reach the throw bar when the piston is mounted on the bottom of the switch. This screw will need to be replaced with a 3/4” 1-72 screw. Also, over time, the constant side pressure on this screw will cause it to bend ever so slightly; but it's just enough of a bend that it fails to fully close the points. I have had to replace this screw on three switches thus far, after 10 years of faultless operation. It only takes a small amount of bending to induce 1 mm of side movement at the end of the screw. Also, I chose to drill two additional holes in the mounting plate to allow for four screws to mount it to the Head Ties. | |||
==Compressor And Air Pressure== | |||
From my compressor to the last switch on the line is about 175 ft. Along that run are about a dozen switches connected to the line via taps using a "T" connector. The Sunset Valley toggle switches "some times" leak a little bit of air and each time you throw a switch you loose some air. As a result, the compressor needs to come on about every 10 minutes to replace the storage tank pressure. My compressor tries to maintain the tank at 125 psi but the pressure lines are set to a much lower pressure. I originally purchased the least expensive (cheapest) compressor I could find (Harbor Freight). Big mistake. That thing was very loud and would scare visitors when it started up. When it failed (froze up) after five years I replaced it with the quietest compressor I could find (it cost a bit more). People hardly notice when it is running making it a very good choice.<br> | |||
I initially ran the line at 35 psi and everything worked fine. Over time, however, switches started getting a bit stiff and I slowly had to increase the pressure. I now run at 45 psi, to ensure a "snappy" throw of the switch points. The return spring in the piston has never been an issue and there is no way (that I know of) to adjust the pressure provided by this spring.<br> | |||
==Air Lines== | |||
The air lines tend to deteriorate over time when exposed to the direct sun. This deterioration causes the lines to become stiff and a bit brittle. A sharp bend in a line experiencing this deterioration results in the formation of small cracks that eventually leak a significant amount of air. Protect the air lines from the direct sun and avoid sharp bends in the line where it is exposed to the sun. | |||
=Electric Switch Motor vs Pneumatic Switch Motor= | =Electric Switch Motor vs Pneumatic Switch Motor= | ||
The biggest disadvantage with pneumatic switch motors appears to be the supply lines. The slightest nick in the line will result in a loss of air pressure causing the switches farther down the line to become inoperable. With electrically operated switch motors a small nick in the insulation of an electric wire does not suffer this same problem. On the other hand, an electrically operated switch motor depends on a short burst of power to the electric solenoid to active the motor; and after that it depends on a relatively weak spring to hold the points in place. With the pneumatic switch motor, the air pressure to throw the switch is constant, holding the point firmly in place; and when the air pressure it removed, the spring returning the points to their Default setting is very strong and provides continuous pressure on the point to hold it in place. In addition, pneumatic switches, by their very design, must be air tight so little ground critters can't get inside to build mud nests and foul up the mechanism. Also, all of the components are stainless steel and/or brass, so there is no issue with corrosion. | The biggest disadvantage with pneumatic switch motors appears to be the supply lines. The slightest nick in the line will result in a loss of air pressure causing the switches farther down the line to become inoperable. With electrically operated switch motors a small nick in the insulation of an electric wire does not suffer this same problem. On the other hand, an electrically operated switch motor depends on a short burst of power to the electric solenoid to active the motor; and after that it depends on a relatively weak spring to hold the points in place. With the pneumatic switch motor, the air pressure to throw the switch is constant, holding the point firmly in place; and when the air pressure it removed, the spring returning the points to their Default setting is very strong and provides continuous pressure on the point to hold it in place. In addition, pneumatic switches, by their very design, must be air tight so little ground critters can't get inside to build mud nests and foul up the mechanism. Also, all of the components are stainless steel and/or brass, so there is no issue with corrosion. | ||
=Authors and Contributors= | |||
*Author: Tom Gaps | |||
*Editor: Don Erikstrup ([[User:DErik|DErik]] ([[User talk:DErik|talk]]) August 2024) | |||
*Others: Please comment on this using the “discussion” tab above or send an email to [mailto:MRT-SIG@RCGRS.com?Subject=MRT-SIG:%20Tracks&Body=Put%20your%20comments%20here. MRT SIG] . And contribute additional information here and in other articles. | |||
Latest revision as of 08:00, 21 August 2024
This article describes the installation and use of pneumatic switches. The information is provided by Tom Gaps, who has installed these on his layout. The details are specific to Sunset Valley switches but may be adapted to other brands of switches.
Under construction/modification by DErik (talk) 14:40, 20 August 2024 (PDT). Source is Tom Gaps.
Standard Mounting
Sunset Valley switches come with two extra long ties located at the points of the switch. These are called the Head Ties. The extra length normally extends out away from the switch on the side of the departing track (inside curve) (see Fig #1). In some cases the head ties need to be on the other side of the switch and can be ordered with Reverse Head Ties.
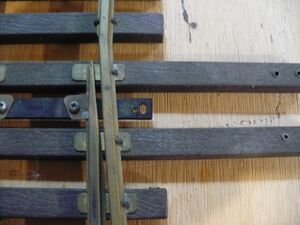
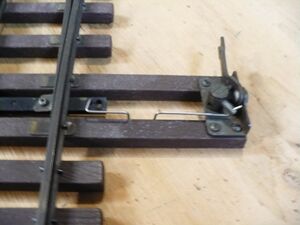
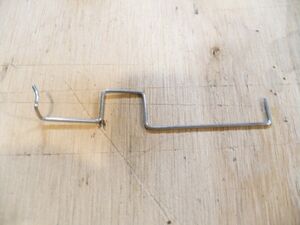
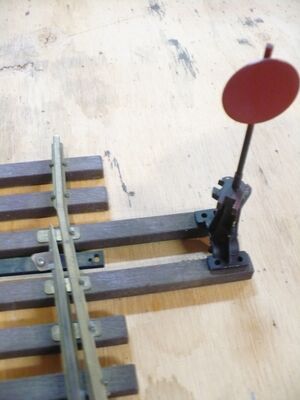
The throw mechanism for the switch is mounted on these Head Ties. Fig #2 shows a manual Ground Throw mounted on the Head Ties and connected to the throw bar with a stainless steel rod. Fig #3 shows that rod in better detail. An optional Switch Stand (Fig #4) can be used in place of the Ground Throw.
For automated throws, a remote controlled pneumatic linear motor can be mounted on the Head Ties. The pneumatic motor is a two position cylinder that is operated by compressed air. The cylinder is moved to the Active Position and held there by compressed air; it is returned to the Default (retracted) position by an internal spring when the compressed air is vented away. At full extension the piston will move 9.5 mm. The throw distance for the switch points is 7.5mm, so the pneumatic piston has excess throw distance which allows it to maintain pressure on the points in both Active and Default positions.
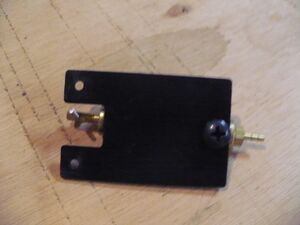
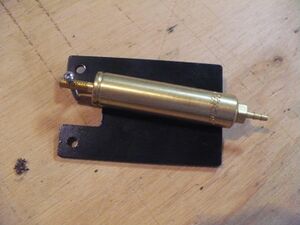
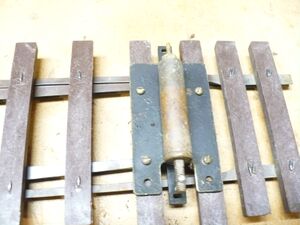
Fig #5 and Fig #6 show the pneumatic motor attached to a mounting plate with a single machine screw at one end. This allows the other end to swing from side to side to adjust for a variation in throw rod connection point. The mounting plate is attached to the top of the Head Ties (see Fig #7 and Fig #8). The air line is connected to one end of the pneumatic motor while the piston extends out the other end. The motor comes with a small machine screw on the end of the piston. This screw drops into a predrilled hole in the throw rod. The mounting plate has two holes that can be used to attach the mounting plate to the Head Ties. Before attaching the mounting plate to the Head Ties, be sure the mounting plate is pulled back about 1mm so that the default position spring will be slightly activated, to ensure the switch points are held firmly in place when the spring returns the points to their default position. This will leave about 8.5 mm of piston movement which is more than enough to move the switch points to the Active Position.
 |
 |
 |
 |
It takes 15-20 psi of air pressure to neutralize the effects of the default position return spring and another 15-20 psi to move the points firmly to the active position, i.e. the air line needs to supply 35-40 psi to operate the switch motor. Use only enough air pressure to safely operate the switch points. Excess air pressure will cause the points to slam into position harder than they need to and may cause the points to fail prematurely from repeated slamming in the stock rail.
Alternate Mounting
When the switch is located some distance away, it can be hard to tell if the points have activated. One solution for this problem is to mount a manual switch stand to the Head Ties and connect it to the throw rod. As the points are moved by the pneumatic motor, the throw rod will activate the switch stand, causing it to rotate in response to the change in point settings. Note: You will need to remove the manual switch stand handle as this handle also acts as a locking mechanism preventing the switch stand from following the change in switch point position.
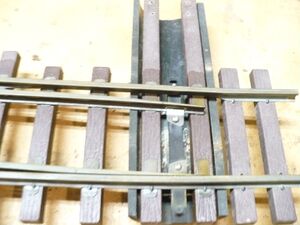
Unfortunately, the pneumatic motor and the manual switch stand can not both be mounted on top of the Head Ties at the same time. The solution to this problem is to mount the pneumatic motor on the bottom of the Head Ties. You can either mount it at the same location on the Head Ties but on the bottom of the Head Ties or you can mount it directly under the switch points. Mounting it directly under the points has the added advantage of being able to choose which end of the throw rod to connect to the motor. When mounted at the top or bottom at the standard location on the Head Ties, the Default Position will always be the straight track, or it will be the curved track path if using Reverse Head Ties. Mounting the switch motor directly under the switch points allows either the straight track position or the curved track position to be the Default Position.
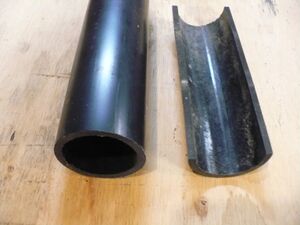
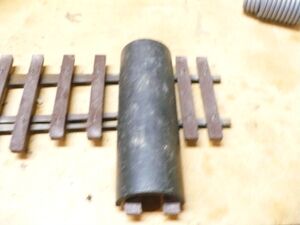
Fig #9 shows the pneumatic motor attached to the bottom of the switch, under the switch points. When mounted to the bottom of the Head Ties, some form of protection must be provided to prevent the ballast under the ties from interfering with the movement of the switch motor piston. One solution is shown in Figs #10 through #13. A length of 2” black PVC pipe cut into a half pipe fits nicely under the switch, straddling the Head Ties and switch motor giving it a protected pocket in which to operate.
Side Notes
Connecting To The Switch
As supplied by Sunset Valley, the 1/2” 1-72 screw at the end of the piston is not long enough to reach the throw bar when the piston is mounted on the bottom of the switch. This screw will need to be replaced with a 3/4” 1-72 screw. Also, over time, the constant side pressure on this screw will cause it to bend ever so slightly; but it's just enough of a bend that it fails to fully close the points. I have had to replace this screw on three switches thus far, after 10 years of faultless operation. It only takes a small amount of bending to induce 1 mm of side movement at the end of the screw. Also, I chose to drill two additional holes in the mounting plate to allow for four screws to mount it to the Head Ties.
Compressor And Air Pressure
From my compressor to the last switch on the line is about 175 ft. Along that run are about a dozen switches connected to the line via taps using a "T" connector. The Sunset Valley toggle switches "some times" leak a little bit of air and each time you throw a switch you loose some air. As a result, the compressor needs to come on about every 10 minutes to replace the storage tank pressure. My compressor tries to maintain the tank at 125 psi but the pressure lines are set to a much lower pressure. I originally purchased the least expensive (cheapest) compressor I could find (Harbor Freight). Big mistake. That thing was very loud and would scare visitors when it started up. When it failed (froze up) after five years I replaced it with the quietest compressor I could find (it cost a bit more). People hardly notice when it is running making it a very good choice.
I initially ran the line at 35 psi and everything worked fine. Over time, however, switches started getting a bit stiff and I slowly had to increase the pressure. I now run at 45 psi, to ensure a "snappy" throw of the switch points. The return spring in the piston has never been an issue and there is no way (that I know of) to adjust the pressure provided by this spring.
Air Lines
The air lines tend to deteriorate over time when exposed to the direct sun. This deterioration causes the lines to become stiff and a bit brittle. A sharp bend in a line experiencing this deterioration results in the formation of small cracks that eventually leak a significant amount of air. Protect the air lines from the direct sun and avoid sharp bends in the line where it is exposed to the sun.
Electric Switch Motor vs Pneumatic Switch Motor
The biggest disadvantage with pneumatic switch motors appears to be the supply lines. The slightest nick in the line will result in a loss of air pressure causing the switches farther down the line to become inoperable. With electrically operated switch motors a small nick in the insulation of an electric wire does not suffer this same problem. On the other hand, an electrically operated switch motor depends on a short burst of power to the electric solenoid to active the motor; and after that it depends on a relatively weak spring to hold the points in place. With the pneumatic switch motor, the air pressure to throw the switch is constant, holding the point firmly in place; and when the air pressure it removed, the spring returning the points to their Default setting is very strong and provides continuous pressure on the point to hold it in place. In addition, pneumatic switches, by their very design, must be air tight so little ground critters can't get inside to build mud nests and foul up the mechanism. Also, all of the components are stainless steel and/or brass, so there is no issue with corrosion.
