BR52 - Model by Bruce McKinney
This article provides a historical perspective for the BR52 locomotive used in Germany during the WW2 era and later. It then goes on to describe how Bruce constructed it, kit-bashing a Trumpeter model.
New or modified article by DErik (talk) being reviewed
History
The first BR52[1] was produced in 1942 and was known as an "AUSTERITY CLASS" locomotive. Austerity means "extreme plainness and simplicity of style or appearance". This was not the only AUSTERITY CLASS locomotive in Germany - as most war time locomotives fell into the Austerity Class - meaning "simplified".
Hitler had mandated the new class of locomotive would replace the over complex BR50 - then the main "goods" locomotive in Germany. The demand was placed on the Armaments and Munitions Division with the demand to reduce man hours to build, use less and simplified materials, and all 13 production factories located in the occupied territories would not deviate from design or function.
In doing so, complex machining was reduced, simplified builds were done to use untrained labor, "frilly" items were deleted (such as front head lamp, railings, bell and smoke deflectors). The BR52 design accomplished these goals as the new design reduced build time by 6000 (yes, 6000) hours over the BR50. Damaged locomotives were easily repaired as parts were produced identically in all factories. The BR52 was THE MOST produced steam locomotive produced by any nation at any time. War time production totaled 6300 - but total production reached 7,794 units. After the war, BR52's were distributed throughout Europe - the Russians renumbering theirs with a TE notation - meaning "war booty".
The crew of the BR52 was expected to work long hours - doing so, the locomotives were equipped with arm chairs for the engineer and fireman, as well as a cab hammock to give breaks to the crew. The cab was enclosed to keep the crew warm with a concertina cloth passage from the back of the locomotive cab to the coal doors on the tender. This locomotive saw much service on the Eastern Front - with those units being "winterized". All plumbing with fluids were plumbed under the outer skin with heavy insulation; and the Knorr Compressor and water control valves were enclosed in insulated boxes. All to keep items from freezing.
Building the Model
My build inspiration was a locomotive currently displayed in Nürnberg (#52-6666)[2] and still operates as the only "un-modernized war time correct" BR52.
 |
 |
She runs specials and excursions throughout Germany today.
I started with a kit from Trumpeter[3] (search for “B52” on the Trumpeter web site) – the Kriegslokomotive BR52 00210 is a 1:35 scale model. This Trumpeter kit was phenomenal. Trumpeter did an excellent job of capturing the major details and the overall build was pretty straight forward and trouble free. However, I opted to buy several after market details as they were just so much superior to the kit parts. Mainly the Knorr Compressor on the engineers side, whistle and the water control valves on the fireman's side. These were LZ Models[4] items produced in Europe and are resin cast. I also replaced the kit provided smoke deflectors with brass deflectors from Voyager[5]. These represented the after war add-ons on this locomotive as war time locomotives had these "frilly" items omitted.
The Trumpeter kit has the original rigid frame tender. This tender was quickly replaced as its faults were quickly apparent. The rigid frame did not allow the wheels to follow the curve of the track and resulted in many derailments and tearing up track. The water delivery system to the boiler was also slow on delivery. This style of tender was quickly replaced with a bathtub design tender with standard freight bogies.
The end of track bumper was scratch built using internet searches for vintage European RR bumpers. Ground work is all various grass mats and bushes from Scenic Express[6]. The two figures are from Mini Art[7] and are period German RR workers. I felt it necessary to add these figures to give scale to just how big this locomotive was - both are 1/35th scale.
 |
 |
 |
 |
Construction details
Cab and backhead
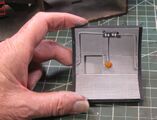
Trumpeter pretty much captured the WW2 cabin interior design. Post war this back head got quite a bit more complicated. No need for the after market PE details set here.
Sadly - nearly all of this will be unseen once I put the roof and doors on - small side windows for viewing - but, I know its there and had fun doing it. Actually - LOVE this red interior.
These things were not built for any comfort - basically a wooden stool, small leather pad and a board for a backrest.
 |
 |
 |
Tender
This is a model of the early tender for the BR52 locomotive. Known as a rigid frame tender. Its design flaws were quickly evident as this HUGE tender - with its fixed trucks misaligned and ripped up the tracks it rode on and often derailed around corners. Quickly retired and replaced with a Vanderbilt style tender with two rotating individual trucks. That then became the "standard" tender for this locomotive. I mentioned - this thing was a HUGE locomotive. The Germans liked BIG, IMPRESSIVE things - think the Tiger 1 tank and the Leopold Gun for example. They needed a BIG power source to move large amounts of men and materials around to support their war effort. It being HUGE, was an easy target and favored target for allied fighter strafing runs. Quite a few YouTube videos available of these things getting blown up by allied pilots.
Trumpeter captured most of the details of this tender...however, a few extra details were added that they felt probably not necessary for the completed model. Using my "Trains in Detail" book on this locomotive, I added, cleaned up or changed a few things. Anything NOT light grey was an add-on and scratch built by me.

|

|

|

|

|
|
 |
 |
Locomotive
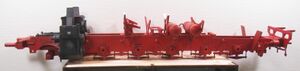
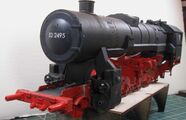
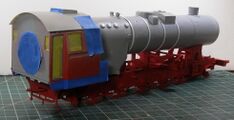
This paint scheme - black with a red chassis, represents a post-war locomotive. Although Trumpeter indicates to apply the eagle and swastika to the cab sides with this scheme, I could find no references to this combination used during war time. In fact - that would just represent a HUGE target opportunity to allied fighter pilots as that red would just be a beacon target. My research found that wartime German locomotives were painted overall a dark grey - not even black. Black actually showed up vividly against a background rather than the dark grey - which blended better with its surroundings.
The fit of the kit is overall excellent. I added some minor details to the cylinders that Trumpeter left off. The boiler cradle arms do not quite meet up with the bottom of the boiler - reading reviews - a kit problem. Styrene shims were added to get a good match.
I am keeping the weathering in line with a "working girl". Also, trying to duplicate the photo's of the example of the real deal on display in Berlin. The only unmolested, war time example of a BR52 in existence - still runs an occasional excursion trip. Others have been modernized, and some sport equipment not found on war time locomotives.
- BR52 locomotive undergoes modification
-

-

-
-
-

-

-
-


Water Feed
LZ Models offers a Knorr Compressor replacement as well as another set of both cab interior and some added exterior details. Most importantly - a great duplicate of the sand dome control valves as the kit one is just pathetically bad.
The Knorr Compressor is just a beautifully executed replacement. LZ Models also provided the valving for the water feed piping located on the fireman's side of the boiler. Its those white pieces in the pictures......The Trumpeter kit version of this locomotive is a winterized version of a BR52 - so, these valves were behind a large metal box on winterized BR52 - with the only controls showing are two round valve controls. These were just too nice to not use and show exposed.
 |
 |
Sand Tubes
The sand tubes are vinyl....and a real challenge to work with. Although they wrap nicely thru the frame...there is no glue in the world that will secure these tubes to the boiler - CA glue just popped off. I got the main connection to the control valves to stay put with some JB weld and a prayer. The small brass "u" straps are necessary to get these things in position.
A few more details to the sand dome controls and then I can finally glue the wheels and side rods in place.

|

|

|
Whistle
The ALWAYS over-engineered German way of doing things............ just check out the whistle control for a BR52 locomotive.
 |
 |
Chassis
Also, Trumpeter does a pretty nice job of under chassis detailing - and will NEVER be seen again...........

Materials and sources
Paints
The engine and tender are painted with basically three shades of grey, the primary color being Vallejo German grey (#70.995). Additional panels were painted with Vallejo dark grey (#70.994) and Mission Models RLM 66 Dark Grey (#MMP-089) The red wheels and undercarriage were painted with Vallejo Dark Vermillion (#70.947) (This, I found, to be a near PERFECT match for that European RR red used in Germany; it has quite a bit of orange in it vs just red.) All above colors airbrushed.
Yes....war time German locomotives were dark grey - NOT black. Although my model was post war - the example in Nuremberg kept the dark grey coloring. German war research found that dark grey locomotives did not stand out against the landscape like a black locomotive did.
I go back over to highlight seams and crevices with Vallejo German camo Black Brown (#70.822) - also airbrushed.
Grunge weathering was accomplished with a variety of AK Interactive and MIG enamel colors. Although its says ENAMEL - these are an oil based product and brushes need to be cleaned with a solvent such as Terpenoid (this is available at ANY good art store and is a mild brush cleaning solvent for oil paints). Applied with a brush - sizes varied from pin point to a 1/4" slant - all sable brushes.
Pretty much any "dirty color" will work with weathering. Some of the weathering enamels I used on this were AK tracks wash (my primary go to weathering enamel) (AK #083)
- AK Engine Grime (AK #082)
- AK rust steaks (AK #013)
- AK Engine Oil (AK #084)
- MIG Black wash (A.MIG -1011)
Any thing that looks dirty and grimy will do.
You can apply these heavy and sloppy, let dry then start to remove with a clean brush dipped in Turpenoid. Almost all the weathering enamels will dry overnight quite a bit lighter than right after application. If you want to go dark - just repeat - its pretty forgiving stuff and easy to work with. No weathering powders or weathering pencils were used on this project.
All three paints Vallejo[8], AK[9], and MIG[10] are made in Europe. Spain to be exact. Any decent hobby shop will/should carry them. Of course, e-Bay if no hobby shop is near you. Even Hobby Lobby has a rack of the basic Vallejo colors. These paints came on the market several years back and have basically changed model painting for the serious modeler; the common stuff before was Testors, Pactra, and Tamiya and were (in my opinion) pretty dismal stuff. Vallejo, MIG, and AK dry absolutely dead flat (very important for uniform/clothing painting), and brush on beautifully for a near sprayed-on look, and airbrush flawlessly - after thinning with water. The other thing to note is the accuracy of the colors - based on actual color chips from current and past military applications. What I LOVE about the complete Vallejo line (and Tammies Hobbies in Beaverton has a complete product rack) is, if you wanted a particular shade of yellow, or red, or blue or green say....there are probably 10 shades of each of those colors to get a pretty close match for your particular application.
Another relatively newer line of acrylics is Mission Models[11]. I have been pleased with the results - dead flat, airbrushes beautifully. Although their color selection is not as vast as the Vallejo or AK lines.
Regarding MY airbrushes. I pretty mush have mid level priced airbrushes. I have a Paasche double action and a Badger 155 Anthem. Both have served me well - but I am going to buy a higher end Iwata here in the near future as their more expensive stuff can produce a pencil-thin line and will be more controllable for thin airbrushed highlights. I have had both the Paasche and Badger for years - just strip them down after use - clean with water then I fill one of my airbrush paint bottles with Windex and run the whole bottle thru the brush with the compressor on. Side note - I had a trigger issue with my Paasche about two months ago - sent it in for repair and they sent me a new (rebuilt) brush within a week. Badger will do the same - both stand behind their products.
Glues
The vinyl tubing that Trumpeter uses in some of their kits is absolutely impervious to gluing. I knew this going in. You can CA glue it - but it will snap out of place the minute you look at it. So, I worked carefully with the sand tubes on the BR52, held them in place temporarily with some CA glue to just get the PE straps in place. The brass PE straps hold quite well with the CA glue - so, once they dried I knew I was not going to get any escaping sand tubes.
Regarding just gluing styrene to stryene parts - like a common model build. I use Tamiya extra thin cement in the little square bottle with the green label. It has a small brush applicator attached to the lid. Just touch the two parts to be glued and capillary action does the rest. You do not need to use gobs of this stuff - a little goes a very long way.
References and Sources
- ↑ Wikipedia on DRB Class 52
- ↑ Wikipedia on Germanisches Nationalmuseum
- ↑ Trumpeter, models of various kinds
- ↑ LZ Models, models, appears to be specialized in military and war era
- ↑ Voyager, parts and accessories, people and other figures, lights
- ↑ Scenic Express, model landscaping supplies
- ↑ Mini Art, miniature painting supplies, brushes, frames, mats
- ↑ Vallejo, Paints for hobby and fine arts, weathering, air brush or regular. tools
- ↑ AK, Paints of various kinds, plastic (ABS, styrene), wood, brass pipes
- ↑ MIG, tools & brushes, kits, dioramas, publications
- ↑ Mission Models, paints, especially, tools and accessories, glues
Authors and Contributors
- BR52 historical research, model construction and other information: Bruce McKinney
- Author and editor: Don Erikstrup (DErik (talk) August 2023)
- Others: Please comment on this using the “discussion” tab above or send an email to MRT SIG . And contribute additional information here and in other articles.